
by Dr Freddy Wordingham
Training a CNN
3. Classifying an image
In the last lesson we wrote a script for training a CNN for image classifiction. So in this lesson, we're going to write a script that uses that trained model to classify an image.
🏷 Classify Script
Let's go ahead and create a new file in our scripts directory called classify.py:
touch scripts/classify.py
In this file we're going to:
- Import the third party dependancies we'll need
- Import the CLASS_NAMES from the train script
- Read an image part from our command line input arguments
- Load the image in a format recognised by the CNN
- Load our pre-trained model
- Use the CNN to make a prediction on the class contained in the image
- Display the probability of each each fitting the given image
Let's take a look at the script:
from tensorflow.keras import models, preprocessing, Model
import sys
import os
import tensorflow as tf
import numpy as np
from matplotlib import pyplot as plt
from train import CLASS_NAMES  # Import class names for label mapping
if __name__ == "__main__":
    # Read image filepath from command line
    input_image_filepath = read_command_line_arguments()

    # Load and preprocess the image
    image_batch = load_image(input_image_filepath)

    # Load pre-trained model
    model = models.load_model(os.path.join("output", "model.h5"))

    # Perform image classification
    predictions = model.predict(image_batch)[0]
    predicted_class = np.argmax(predictions)
    print(f"Predicted class is: {CLASS_NAMES[predicted_class]}")

    # Print class probabilities
    for i in range(len(predictions)):
        class_name = CLASS_NAMES[i].ljust(16, " ")
        probability = "{:.1f}".format(predictions[i] * 100)
        print(f"{class_name} : {probability}%")
So quite straightforwad, we're reading the command line arguments to get an image path, and then we're transforming that image into a type suitable for the CNN. Then we're loading the CNN we trained in the last lesson, and running the image through to make a prediction.
The "Predicted class" is going to be the class with the highest probability. And we're also displaying the likelihoods of the other classes.
For this script to run we'll also need to define two new functions: read_command_line_arguments and load_image, so let's take a look at those now.
📜 Command Line Arguments
def read_command_line_arguments():
    """
    Read the first command line argument as a image filepath.

    Returns:
        The image filepath.
    """
    if len(sys.argv) != 2:
        print(f"Requires exactly 1 input, but received {len(sys.argv) -1}")
        print(f"Use: python scripts/classify.py <path/to/image.png>")
        exit()
    input_image_filepath = sys.argv[1]
    return input_image_filepath
We can access the additional arguments we give to our python script using the sys.argv function, which returns a list of strings- one for each argument.
We first check that we got the number of argumentds required, and if so we read the second (index [1]) as the image file path.
ℹ️ argv[0] always exists, and is the path to our script file.
🖼️ Load Image
def load_image(path):
    """
    Load the image at the given filepath as an array of RGB component values

    Args:
        path: The path to the image to load.

    Returns:
        The image as an array of RGB component values.
    """

    # Load the image and resize it to match the model's expected input shape
    image = preprocessing.image.load_img(path, target_size=(32, 32))

    # Convert image to array
    image_array = preprocessing.image.img_to_array(image)

    # Expand dimensions for batch processing
    image_batch = tf.expand_dims(image_array, 0)

    # Normalise the image
    image_batch /= 255.0

    return image_batch
This function uses Keras's preprocessing module to load the image and transform it into the 32 x 32 resolution the model expects.
We need the image in a "batch" (a four-dimensional structure of [width, height, colour, number_of_ images]), so we turn it into an array and expand the dimensions so that it has a "number of image" dimensions (even though we are only processing a single image at a time here).
We also need to normalise the image such that each of the RGB channels are between 0.0 and 1.0. By default the RGB values are stored as 8-bit integers, meaning they range from 0 to 255.
🚀 Run
Now run the script providing a path to the target image as the second argument, for example:
python scripts/classify.py resources/dog.jpg
I used a picture of my beautiful dog, Ruby 😍
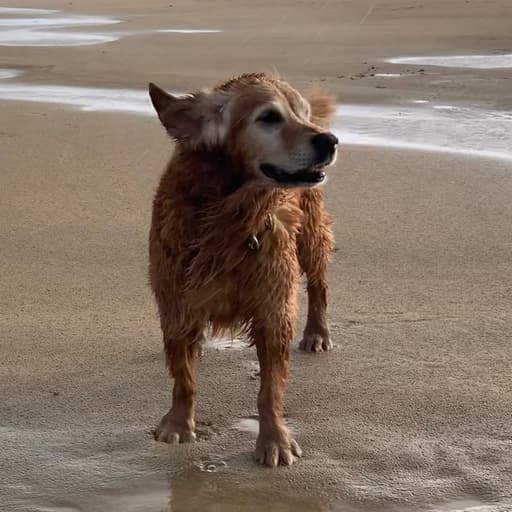
The CNN classifies her as a horse at the moment.
So hopefully there are still some more gains to be made from training!

In the next lesson, let's try visualising the activations of the CNN layers, and seeing if we can interpret what's going on in there!
📑 APPENDIX
🏃 How to Run
As always, remember to activate the virtual environment if you haven't already:
source .venv/bin/activate
Install any required packages:
pip install -r requirements.txt
If you haven't already, train a CNN:
python scripts/train.py
Then, to classify your own images run the following:
python scripts/classify.py <path/to/your/image.jpg>
🗂️ Updated Files
Project structure
.
├── .venv/
├── .gitignore
├── resources
│   └── dog.jpg
├── output
│   ├── model.h5
│   ├── sample_images.png
│   └── training_history.png
├── scripts
│   ├── classify.py
│   └── train.py
├── README.md
└── requirements.txt
requirements.txt
matplotlib
tensorflow
scripts/classify.py
from tensorflow.keras import models, preprocessing, Model
import sys
import os
import tensorflow as tf
import numpy as np
from matplotlib import pyplot as plt
from train import CLASS_NAMES  # Import class names for label mapping


def read_command_line_arguments():
    """
    Read the first command line argument as a image filepath.

    Returns:
        The image filepath.
    """
    if len(sys.argv) != 2:
        print(f"Requires exactly 1 input, but received {len(sys.argv) -1}")
        print(f"Use: python scripts/classify.py <path/to/image.png>")
        exit()
    input_image_filepath = sys.argv[1]
    return input_image_filepath


def load_image(path):
    """
    Load the image at the given filepath as an array of RGB component values

    Args:
        path: The path to the image to load.

    Returns:
        The image as an array of RGB component values.
    """

    # Load the image and resize it to match the model's expected input shape
    image = preprocessing.image.load_img(path, target_size=(32, 32))

    # Convert image to array
    image_array = preprocessing.image.img_to_array(image)

    # Expand dimensions for batch processing
    image_batch = tf.expand_dims(image_array, 0)

    # Normalise the image
    image_batch /= 255.0

    return image_batch


if __name__ == "__main__":
    # Read image filepath from command line
    input_image_filepath = read_command_line_arguments()

    # Load and preprocess the image
    image_batch = load_image(input_image_filepath)

    # Load pre-trained model
    model = models.load_model(os.path.join("output", "model.h5"))

    # Perform image classification
    predictions = model.predict(image_batch)[0]
    predicted_class = np.argmax(predictions)
    print(f"Predicted class is: {CLASS_NAMES[predicted_class]}")

    # Print class probabilities
    for i in range(len(predictions)):
        class_name = CLASS_NAMES[i].ljust(16, " ")
        probability = "{:.1f}".format(predictions[i] * 100)
        print(f"{class_name} : {probability}%")